Saturday, May 30, 2020

How does VRAY work in 3ds Max


Lecturer : 35

* 3D Texturing the extruded 2D floor plan elements

Texturing is quite important to control the overall look of your scenery and thus plays a major role to create a good architectural visualization.

Always try to use colors or material which is complimentary and soothing to eye when rendered. Don’t use something which is too contrast or too dull.

In this project I have used Vray material. Click on the Material Editor tab from the toolbar (Shortcut –M)> Click on the material slot > select Standard and pick Vray Mtl from the Material/Map Browser.

For example, to make a material for the doors I have selected a white paint material as a bitmap. Now to get the properties of a painted door I have given a reflection of value 25 and glossiness of 0.8. I have used the same map in the bump with a value of 20.

From the modifier list, give an UVW Map to get the right scale of the material.

Below are some of the examples of material and their properties which I have used in this project.


3D Texturing


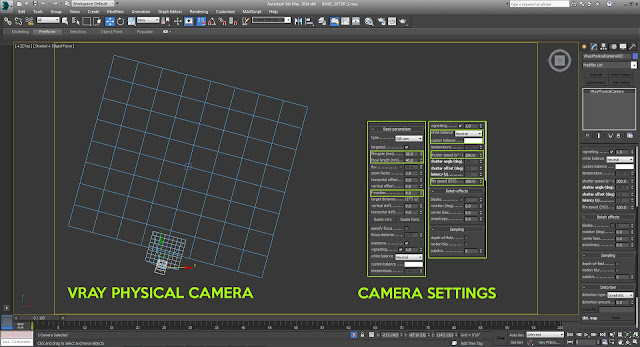
* How to set up the Vray Physical Camera in 3ds MAX ?

 I use the Vray Physical Camera and choose a proper position and viewing angle.

Below I will describe the settings of my Vray Physical Camera which I have used for this project:

The changes in the value of focal length, white balance, f number, shutter speed and ISO can affect your lighting and render to a higher level. So let’s go to the in detail for these where you can understand what they are and why they affect the final output.


1)   Focal length: Focal length is set in millimetres and it just work like changing a lens on SLR camera. The lower the value you give, the wide the angle you get and the higher the value you give, the smaller the angle you get.

2)   F Number: The lenses aperture is usually specified as f number.  Less value gives more light and increasing depth of field effect,  while higher value decreases the light with less depth of field.

3) White balance: Using white balance color allows additional   modifications to the output.


Vray Physical Camera


* Set up Vray lightning for 3D architecture rendering


Vray lighting brings out the value for your hard work you have done in texturing. In this project I have used only two lights:

1)    Vray dome light

2)    Vray sun


Vray dome lighthelps to create the overall illumination of the architecture scene. It helps to fill all those dark places where light cannot reach. It works as a skylight and gives your rendering a brighter and softer looks.

To create a Vray dome light, go to lights > Vray > Vray light from object type > select dome from the type and click on the viewport.

I have used the following setting for my Vray dome light in the image below:


Vray lightning


Vray Sun: Although Vray dome light make the scene brighter, but it doesn’t create any shadow. And a rendering without a shadow looks somehow dead. You should always create interesting shadows to get a good visualization as it simply helps to understand the 3D geometry – and that is what it is all about…

Vray sun helps you to create interesting shadows. You can play around with the Vray sun with different angles and height to get the best output. I have used following setting for Vray sun in the image below:


How to create Vray Sun


* Vray Render settings in 3DS MAX

In Vray the most magical part is to define the “right” setting. You can change the overall look of the scene with the help of these settings. There are some preset settings which you can apply to get a good rendering result.

But to get something out of the box, you have to play around with it. Here are some of the render settings which I have used for this project to get a good output. Of course you can try to experiment with other settings to tweak it even more or create a specific look for your project.
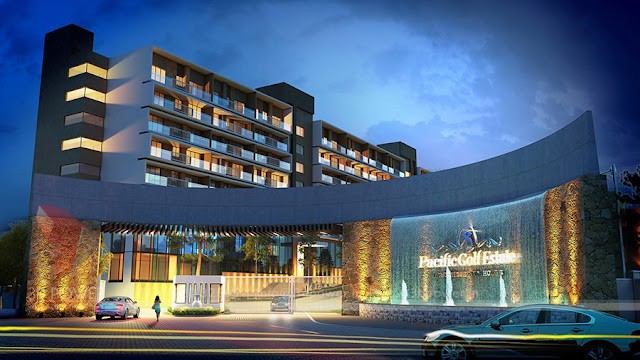
 

Vray Render settings


With these settings I already get a proper result even without any additional Photoshop post production work. My rendering at this stage looks like this:

Render image


You can definitely now import it to Adobe Photoshop and play around with brightness contrast, levels and tones. But at this stage I am pretty happy with this result as it meets my overall expectations.

I hope you enjoyed the tutorial and got an idea how I create a 3D floor plan rendering of my architectural designs by using 3DS MAX and Vray!


Thank you Friends your next lecture see you soon.


How do you render a plan


Lecturer : 34

* Modelling the 3D ground floor plan rendering

Let`s start with the walls. For modeling the walls I here used the spline modeling method. Before you start you should think about the potential camera position and angle you use. In my case I wanted to highlight the entrance area, so I kept the wall heights low at the front as 4 feet. And the higher walls on the back as 8 feet (actual height of the wall).


Extruding the walls:

1   Go to top view (shortcut-T)

2.  Switch on 2.5 snap toggle icon. (Shortcut-S).

3.  Right click on the snap toggle and select only vertex from the grid and snap setting dialog box.

    4. Draw the walls with the line tool from top view and give extrude              modifier with 4 feet or 8 feet in the amount respectively.


The Snap Toggle tool is very powerful for modeling architectural drawings as the vertex mode helps to draw the line which can stick on to the plan and get accurate measurements.

To make the sills and beam bottoms for the windows, use the same method. Keep 7 feet as lentil level and 1 foot for beam bottom as shown in the picture below.

I took 1 foot as sills for the double hung windows in living area, master bedroom, 2 feet 6 inches for the bedroom windows, kitchen and utility.


Floors:

For flooring, divide the area into four categories:

1)    Wooden flooring for living and bedroom

2)    Carpet flooring for master bedroom and master toilet closet

3)    5×1.5 feet tiles for toilets and utility

4)    Concrete flooring for front patio and parking area.


* Windows and doors:

As per the client’s requirement, I have modeled double hung French windows and normal windows as per the sill and lentil levels modeled before.

The double hung windows are 2 feet 6 inches by 6 feet with 50 mm of outer border. The other windows are 3 feet 3 inches by 4 feet 6 inches in height.


* There are different doors which have been used in this plan:

1)  Bedroom doors- 7 feet by 2 feet 8 inches wide with 50 mm of border

2)    Entrance door- 7 feet by 3 feet wide with 50 mm of border

3)    Toilet doors- 7 feet by 2 feet 6 inches wide with 50 mm of border

4)    Pantry door- 7 feet by 2 feet wide with 50 mm of border.


* Counter tops:

There are ready made counter tops available out there, but I preferred to model it by myself as it gives me the flexibility to design exactly according to the plan.

For kitchen and breakfast counter tops, draw line and extrude 25 mm (1 inch approx.) thick granite and place it 800 mm (2 feet 6 inches) up from the finished floor level.

Follow the same for all the toilet basin counters. Now you can place the meshes of kitchen sink, toilet sink beneath the counter and can cover it up by cabinet below.


* kitchen model furniture

Place all the furniture like bed, dining table, living couch TV tops with TVs and try to place all those objects which you can see around in your house which and will make your scene more lively. In the scene observe the varieties of objects which have been used.

Additional you can give wall tiles for kitchen and toilets for getting more features. I have given 5 mm wall tile for the toilets and kitchen.


 Thank you Friends your next lecture see you soon.


how to create autcad plan import with 3d max


Lecturer : 33

* How Importing 2D floor plan into 3DS MAX ?


Importing and AutoCAD plan is a very crucial step in this tutorial which should be taken care of.

An AutoCAD plan can be imported in 3DS Max in different file units like Inches, feet, millimetre, centimetre etc. Selecting a unit depends upon the unit settings of your AutoCAD drawing.

Set up the units: The AutoCAD plan I am importing is measured in meters. It is best to use the same setting in 3ds max.


1.  Start 3Ds Max

2.  Choose unit setup from customize menu

3. In the unit setup dialog choose US standard> Feet w/fractional   inches and leave the other value set to their defaults.

unit setup


* Import the DWG file:

.

     1. From the application menu, choose import

2. Browse to the folder of your choice and select the DWG file and click Open

3. Click the setting to default and click OK

4. Group the plan from Group tab and set the x, y and Z coordinates to Zero

5. Right click > choose freeze selection.


Importing 2D floor plan into 3DS MAX


In import option Dialog box, I chose Inches because the AutoCAD drawing based on Feet and Inches. So if your drawing is made in meters, then first change the unit setup into metric and then select meters in the import options.


Thank you Friends your next lecture see you soon.


What is 3d architectural rendering


Lecturer : 32


* How to create a 3D architecture floor plan rendering ?             

In the world of architecture and interior design, 3D renderings play a major role for better communication between the architect or designer and his clients. Not everybody can “read” an architectural 2D floor plan with all its technical elements therefore it is important to convert this plan into more understandable layout. An easy way is to use only the most relevant elements of the 2D drawing and add some colors to make it more understandable. But during the last years the 3D rendering of the architecture floor plan becomes more and more popular as it presents the design in a way everybody can understand directly. So today in this tutorial I am going to show you the process of converting 2D floor plan into a realistic 3D floor view.

3D floor plan


* What to keep in mind when creating a 3D floor rendering ?


First of all I want to point out that it is not always the right choice to go for a 3D floor rendering. Why? … because it depends on the project status from my point of view. Generally you start every project on a rough level of detail and be detailed down the road. Your communication strategy with drawings, images and renderings with the client should follow this typical route. Start with presentation material that do not show every detail (material, furniture etc.) but rather leaves space for ideas and interpretations of the client. In a later stage when you have fixed the general design of the floor plan you can use a 3D rendering to discuss materials but also fix some minor changes in the floor plan layout as the client now gets a better feeling about proportion etc… 

So I like to use the 3D floor plan rather in a later stage of the design when I already have a clue about the materials and interior the client likes – otherwise you risk to “destroy” your overall layout idea with the wrong kind of materials.


* Materials and interior wishes of the client

Every project is different so it is important to keep the overall objective and requirements in mind to make the most out of it. Therefore the first step to start this project is to know the project requirements.


or this project, the client had some specific wishes in terms of materials.

1)    Wooden flooring's

2)   Carpet flooring for master bedroom

3)    Double hung windows in the living room and master bedroom

4)    White painted wooden doors and windows

5)    Objects in the scene which makes the render more lively


*Software used to create the 3D floor rendering


1) Modeling, lighting & rendering software: Autodesk 3Ds Max and   Vray  

2)  Post Production Software: Adobe Photoshop

3)  Models- Furniture and meshes from ever motion.


* To give you a good overview about the steps I make from start to finish, I have divided this tutorial into following parts:

      1)    Importing 2D floor plan into 3Ds Max.

 2)   Modeling

  3Texturing

  4) Vray lighting

 5)   Vray render settings


Thank you Friends your next lecture see you soon.


Friday, May 29, 2020

What are the responsibilities of a designer


Lecturer : 31


* 3D designer

           3D visualizers bring architects’ ideas to life, taking plans, architectural illustrations and other reference materials and using these to produce photo-realistic 3D images or animations of proposed buildings and developments. As a 3D visualizer, you’ll need to be both creative and technically-minded, in order to model prospective buildings that will both function well and look good.


* 3 डी डिजाइनर

        3 डी विज़ुअलाइज़र योजना, वास्तु चित्र और अन्य संदर्भ सामग्रियों को लेकर आर्किटेक्ट के विचारों को जीवन में लाते हैं और इनका उपयोग करके फोटो-यथार्थवादी 3 डी छवियों या प्रस्तावित इमारतों और घटनाओं के एनिमेशन का निर्माण करते हैं। एक 3D विज़ुअलाइज़र के रूप में, आपको संभावित इमारतों को मॉडल करने के लिए रचनात्मक और तकनीकी रूप से दिमागदार दोनों होने की आवश्यकता होगी, जो दोनों अच्छी तरह से काम करेंगे और अच्छे दिखेंगे।


* 3D Designer Responsibilities.


Develop 3D designs for new products.

Review and enhance 3D designs for existing products.

Manage documentation of both new and revised 3D designs.

Understand the project requirements and develop high quality designs accordingly.

Develop design layouts for complex projects using Computer Aided Design (CAD) tools.

Develop primary sketches and models for final selection of product designs.

Review 3D designs and provide recommendations.

Select materials, engineering standards, and generic parts for 3D product designs.

Present designs to clients and internal teams clearly.

Participate in team meetings and brainstorming sessions.

Develop product information packages including drawing specifications.


 * 3 डी डिजाइनर जिम्मेदारियों।

नए उत्पादों के लिए 3 डी डिजाइन विकसित करें।
मौजूदा उत्पादों के लिए 3 डी डिज़ाइनों की समीक्षा करें और उन्हें बढ़ाएं।
दोनों नए और संशोधित 3 डी डिजाइन के प्रलेखन का प्रबंधन करें।
परियोजना की आवश्यकताओं को समझें और तदनुसार उच्च गुणवत्ता वाले डिजाइन विकसित करें।
कंप्यूटर एडेड डिज़ाइन (CAD) टूल का उपयोग करके जटिल परियोजनाओं के लिए डिज़ाइन लेआउट विकसित करना।
उत्पाद डिजाइनों के अंतिम चयन के लिए प्राथमिक रेखाचित्र और मॉडल विकसित करें।
3 डी डिजाइनों की समीक्षा करें और सिफारिशें प्रदान करें।
3D उत्पाद डिज़ाइन के लिए सामग्री, इंजीनियरिंग मानकों और सामान्य भागों का चयन करें।
ग्राहकों और आंतरिक टीमों को स्पष्ट रूप से डिजाइन प्रस्तुत करें।
टीम की बैठकों और विचार मंथन सत्रों में भाग लें।
ड्राइंग विनिर्देशों सहित उत्पाद जानकारी पैकेज विकसित करें।


Thank you Friends your next lecture see you soon.


What is 3d max design


Lecturer
 : 30

Why do people use 3D rendering and architectural visualization?


Architecture and the design of the urban environment involves a multitude of stakeholders: engineers, architects, planners and non-specialists. All of which view the process from different perspectives, with different objectives, needs and wants in mind. This obviously has many challenges, however, for any architectural project to be a success it requires a “shared understanding” to be reached between all of the parties involved... Luckily 3D rendering and architectural visualizations techniques can help with this.

Using powerful 3D rendering software architects, designers and 3D artists can manipulate designs in real time, quickly transitioning between concept and concrete and exploring different options, as well as, making refinements and creating multiple versions of the designs. Sketch Up, Rhino, V-Ray, Maxwell, Mental Ray and AutoCAD are just a few of the powerful 3D modelling and rendering software’s, empowering design and dazzling clients today. Furthermore by giving architects and designers the tools to visualize and immerse themselves in the  their designs, they are able to gain a much clearer understanding of both the “qualitative and quantitative nature” of the spaces they are designing. So in summary 3D rendering and architectural visualization can help architects and designers work collaboratively and communicate ideas more efficiently. 3D visualization can be used as a marketing tool with clients or for planning consultations with planners, and at the same time can be used to improve the way buildings are developed by design teams. So why isn't everyone using them?


3D Realistic Render image


3D Realistic Render image

                                                                                                                                                                                            
* लोग 3D रेंडरिंग और आर्किटेक्चरल विज़ुअलाइज़ेशन का उपयोग क्यों करते हैं ?

 वास्तुकला और शहरी वातावरण के डिजाइन में हितधारकों की एक भीड़ शामिल है: इंजीनियर, आर्किटेक्ट, योजनाकार और गैर-विशेषज्ञ। जो सभी विभिन्न दृष्टिकोणों से प्रक्रिया को देखते हैं, विभिन्न उद्देश्यों, जरूरतों और मन में चाहते हैं। यह स्पष्ट रूप से कई चुनौतियां हैं, हालांकि, किसी भी वास्तुशिल्प परियोजना के लिए सफल होने के लिए इसमें शामिल सभी पक्षों के बीच "साझा समझ" की आवश्यकता होती है ... सौभाग्य से 3 डी प्रतिपादन और वास्तु दृश्य तकनीक इसके साथ मदद कर सकती हैं।

 शक्तिशाली 3 डी रेंडरिंग सॉफ्टवेयर आर्किटेक्ट्स, डिजाइनरों और 3 डी कलाकारों का उपयोग वास्तविक समय में डिजाइनों में हेरफेर कर सकता है, अवधारणा और कंक्रीट के बीच जल्दी से संक्रमण कर सकता है और विभिन्न विकल्पों की खोज कर सकता है, साथ ही साथ शोधन और डिजाइन के कई संस्करण बना सकता है। स्केच अप, राइनो, वी-रे, मैक्सवेल, मेंटल रे और ऑटोकैड आज शक्तिशाली 3 डी मॉडलिंग और रेंडरिंग सॉफ्टवेयर में से कुछ हैं, जो डिजाइन और चमकदार ग्राहकों को सशक्त बनाते हैं। आर्किटेक्ट्स और डिज़ाइनरों को अपने डिजाइन में कल्पना करने और खुद को डुबोने के उपकरण देने के अलावा, वे उन दोनों स्थानों की "गुणात्मक और मात्रात्मक प्रकृति" की बहुत स्पष्ट समझ हासिल करने में सक्षम हैं जो वे डिजाइन कर रहे हैं। तो सारांश में 3 डी प्रतिपादन और वास्तु दृश्य वास्तुकारों और डिजाइनरों को सहयोगात्मक रूप से काम करने और विचारों को अधिक कुशलता से संवाद करने में मदद कर सकते हैं। 3D विज़ुअलाइज़ेशन का उपयोग क्लाइंट्स के साथ मार्केटिंग प्लानिंग टूल के रूप में या प्लानर्स के साथ विचार-विमर्श के लिए किया जा सकता है, और साथ ही साथ डिज़ाइन टीमों द्वारा भवनों के विकास के तरीके को बेहतर बनाने के लिए उपयोग किया जा सकता है। तो हर कोई उनका उपयोग क्यों नहीं कर रहा है?


Thank you Friends your next lecture see you soon.


🙏🙏🌻🌻Hanuman Jayanti Coming Soon 🌻🌻🙏🙏

 🙏🙏🌻🌻  Hanuman Jayanti Coming Soon 🌻🌻🙏🙏 हनुमान जयंती का पर्व हिन्दू धर्म में बहुत ही श्रद्धा और उत्साह के साथ मनाया जाता है। यह दिन...