Texturing
is quite important to control the overall look of your scenery and thus plays a
major role to create a good architectural visualization.
Always
try to use colors or material which is complimentary and soothing to eye when
rendered. Don’t use something which is too contrast or too dull.
In this
project I have used Vray material. Click on the Material Editor tab from the
toolbar (Shortcut –M)> Click on the material slot > select Standard and
pick Vray Mtl from the Material/Map Browser.
For
example, to make a material for the doors I have selected a white paint
material as a bitmap. Now to get the properties of a painted door I have given
a reflection of value 25 and glossiness of 0.8. I have used the same map in the
bump with a value of 20.
From the
modifier list, give an UVW Map to get the right scale of the material.
Below are
some of the examples of material and their properties which I have used in this
project.
* How to set up the Vray Physical
Camera in 3ds MAX ?
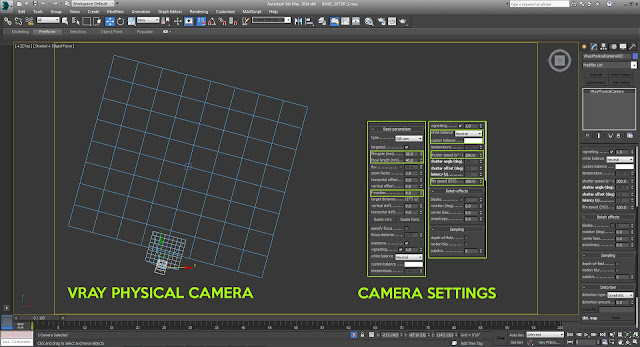
I use the Vray Physical Camera and choose a proper position and viewing angle.
Below I
will describe the settings of my Vray Physical Camera which I have used for
this project:
The
changes in the value of focal length, white balance, f number, shutter speed
and ISO can affect your lighting and render to a higher level. So let’s go to
the in detail for these where you can understand what they are and why they
affect the final output.
1) Focal length: Focal length is set
in millimetres and it just work like changing a lens on SLR camera. The lower
the value you give, the wide the angle you get and the higher the value you
give, the smaller the angle you get.
2) F Number: The lenses aperture is
usually specified as f number. Less value gives more light and increasing depth
of field effect, while higher value decreases the light with less depth of
field.
3) White balance: Using white
balance color allows additional modifications to the output.
* Set up Vray lightning for 3D
architecture rendering
Vray
lighting brings out the value for your hard work you have done in texturing. In
this project I have used only two lights:
1)
Vray dome
light
2)
Vray sun
Vray dome light : helps to create the overall illumination of the architecture scene. It helps to fill all those dark places where light cannot reach. It works as a skylight and gives your rendering a brighter and softer looks.
To create
a Vray dome light, go to lights > Vray > Vray light from object type >
select dome from the type and click on the viewport.
I have
used the following setting for my Vray dome light in the image below:
Vray Sun: Although Vray dome light make
the scene brighter, but it doesn’t create any shadow. And a rendering without a
shadow looks somehow dead. You should always create interesting shadows to get
a good visualization as it simply helps to understand the 3D geometry – and
that is what it is all about…
Vray sun
helps you to create interesting shadows. You can play around with the Vray sun
with different angles and height to get the best output. I have used following
setting for Vray sun in the image below:
* Vray Render settings in 3DS MAX
In Vray
the most magical part is to define the “right” setting. You can change the
overall look of the scene with the help of these settings. There are some
preset settings which you can apply to get a good rendering result.
But to
get something out of the box, you have to play around with it. Here are some of
the render settings which I have used for this project to get a good output. Of
course you can try to experiment with other settings to tweak it even more or
create a specific look for your project.
With
these settings I already get a proper result even without any additional
Photoshop post production work. My rendering at this stage looks like this:
You can
definitely now import it to Adobe Photoshop and play around with brightness
contrast, levels and tones. But at this stage I am pretty happy with this
result as it meets my overall expectations.
I hope
you enjoyed the tutorial and got an idea how I create a 3D floor plan rendering
of my architectural designs by using 3DS MAX and Vray!
Thank you Friends your next lecture see you soon.


No comments:
Post a Comment